Wednesday 2 November 2016

Getting Custom Field Id without hardcoding through Tooling API (Without Http Callout also)

Hi,

We can get custom field ids for URL hacking to auto populate through Tooling API as shown below.

Apex Code:

List<FieldDefinition> fieldList =  [SELECT DurableId,QualifiedApiName FROM FieldDefinition WHERE EntityDefinition.QualifiedApiName ='Account'and QualifiedApiName='NoofEmployees__c'];
String NoofEmployeesId = fieldList[0].DurableId.split('\\.')[1];

Visualforce Page (Java Script):

<script type="text/javascript">
            var __sfdcSessionId = '{!GETSESSIONID()}';
</script>
<script src="../../soap/ajax/38.0/connection.js" type="text/javascript"></script>
<script>
var qr = sforce.connection.query("SELECT DurableId,QualifiedApiName FROM FieldDefinition WHERE EntityDefinition.QualifiedApiName ='Account'and QualifiedApiName='NoofEmployees__c'" );
              var NoofEmployeesId = qr.getArray("records")[0].DurableId.split('.')[1];
 </script>


Thursday 15 September 2016

Exposing an Apex Class as REST Web Service

Hi ,

We are going to learn how to write a REST webservice in salesforce.com.

We can expose our Apex classes and methods so that external applications can access our code

and our application through the REST architecture.


 @RestResource annotation is used to expose a class as REST resource .

 Similarly we have to add annotations to methods to expose them throug REST like @HttpPost,@HttpGet etc.,

 If we add "@HttpGet" annotation for a method to expose it as a Rest resource then that can be called by Http GET request
 from external applications.

Sample Post Service:
 ---------------------
@RestResource(urlMapping='/DoctorService/*')
global without sharing class StudentCreationcls {
    @HttpPost
    global static String createStudentRecord(DoctorServiceParser doctObj){
        Doctor__c doctorObj = new Doctor__c();
        doctorObj.Name =doctObj.Name;
        doctorObj.ConsultationFee__c=doctObj.ConsultationFee;
        doctorObj.FirstName__C=doctObj.FirstName;
        doctorObj.LastName__c=doctObj.LastName;
        doctorObj.Salary__c = doctObj.Salary;
        doctorObj.Gender__c = doctObj.Gender;            
     
        Database.saveResult saveResult = database.insert(doctorObj,false);
        if(saveResult.isSuccess()){
            System.debug('Record Id:'+saveResult.getId());
        }
        else{
            System.debug('saveResult:'+saveResult.getErrors());
        }
        //Response
        JSONGenerator gen=JSON.createGenerator(true);    
        gen.writeStartObject();
        gen.writeStringField('message','Doctor record is created Successfully');
        gen.writeEndObject();    
        String responseString= gen.getAsString();
        return responseString;
    }
}

Parser Class:
------------------
This class will be used for parsing the details in the request
global class DoctorServiceParser {

    global String Name{get;set;}
    global String FirstName{get;set;}
    global decimal consultationFee{get;set;}
    global String LastName{get;set;}
    global decimal Salary{get;set;}
    global String Gender{get;set;}
}

Our service endpoint will be :https://hostnamesalesforce/services/apexrest/DoctorService


Request Format for this:
--------------------------
 {"doctObj":{
"Name":"Balaji",
"Gender":"M",
"FirstName":"Balaji",
"LastName":"M",
"ConsultationFee":2000,
"Salary":500000
}
 }

We can execute this in rest Explorer of workbench for validating before we are going to give for exteranl applications.


References:

https://developer.salesforce.com/docs/atlas.en-us.apexcode.meta/apexcode/apex_rest_code_sample_basic.htm
https://developer.salesforce.com/page/Creating_REST_APIs_using_Apex_REST
https://developer.salesforce.com/docs/atlas.en-us.202.0.api_rest.meta/api_rest/quickstart_prereq.htm

Saturday 3 September 2016

Excellent C ,C++ ,Java ,Photo Shop Tutorias

Hi Guys,

Please find the below url for excellent tutorials of C,C++,Java ,Photo Shop Tutorials.


http://60minutestutorials.com/


Contact Details :

Sri Sai Computer Education

Phone:+91 9885094573,7386972889 ,

Kadapa,
Andhra Pradesh (state),
India(country) -- 516001.


Saturday 6 August 2016

Create Lead Record using Lightning Component

Hi,

This example explains you how to create lead record from Lightning component.

here we did the following things

  • one apex class with aura enabled methods  which has lead insert.
  • one  Lightning component you can see previous example how to create a component
  • included lightning styles from lightning design system.
  • include controller with lightning component to invoke apex method and process
  • created one app to execute component
Apex class:


public class LightningLeadCreatecls {
   @auraenabled
    public static Id creatLeadRecord(Lead leadObj){
        upsert leadObj;
        return leadObj.id;
    }
}

Component:leadCreation

<aura:component implements="force:appHostable,flexipage:availableForAllPageTypes,flexipage:availableForRecordHome,force:hasRecordId" access="global" controller="LightningLeadCreatecls">
 <!--including lightning styles-->
    <ltng:require styles="{!$Resource.Lightning_slds+'/assets/styles/salesforce-lightning-design-system.css'}"/>
     <ltng:require styles="{!$Resource.Lightning_slds+'/assets/styles/salesforce-lightning-design-system.min.css'}"/>
<!-- Preparation of lead object with fields-->
    <aura:attribute name="leadObj" type="Lead"  default="{'sobjectType':'lead',
                                                           'FirstName':'',
                                                            'LastName':'',
                                                          'Company':'',
                                                      'Email':''}"/> 
   <div class="slds">
       <div class="slds-form-element">
          <label class="slds-form-element__label" for="FirstName">First Name</label>
          <div class="slds-form-element__control">
            <ui:inputText aura:id="FirstName" class="slds-input" value="{!v.leadObj.FirstName}" placeholder="First Name" />
          </div>
        </div>
       <div class="slds-form-element">
          <label class="slds-form-element__label" for="LastName">Last Name</label>
          <div class="slds-form-element__control">
            <ui:inputText aura:id="LastName" class="slds-input" value="{!v.leadObj.LastName}" placeholder="Last Name" />
          </div>
        </div>
       <div class="slds-form-element">
          <label class="slds-form-element__label" for="Company">Company</label>
          <div class="slds-form-element__control">
            <ui:inputText aura:id="Company" class="slds-input" value="{!v.leadObj.Company}" placeholder="Company" />
          </div>
        </div>
       <div class="slds-form-element">
          <label class="slds-form-element__label" for="Email">Email</label>
          <div class="slds-form-element__control">
            <ui:inputText aura:id="Email" class="slds-input" value="{!v.leadObj.Email}" placeholder="Email" />
          </div>
        </div>
       <div class="slds-form-element">        
          <div class="slds-form-element__control">
            <ui:button label="Save" press="{!c.save}"/>
          </div>
        </div>
</div>
</aura:component>

Controller:
-----------
({
save : function(component, event, helper) {    
    var action = component.get("c.creatLeadRecord");
            action.setParams({"leadObj":component.get("v.leadObj")});
            action.setCallback(this,function(result){
            component.set("v.isShow",false);
            var leadId = result.getReturnValue();
            alert('leadId'+leadId);
        });
         $A.enqueueAction(action);
}
})

App:
------
<aura:application >
    <c:LeadCreation />
</aura:application>


output:
--------


Sunday 3 July 2016


Lightning Component Creation (Account List Example)

Hi,
This example explains you how to create a component and place the same into the Lightning app.

To create a Lignting Component we have different tools . For now we are going to use developer console to create Component.

Navigation:


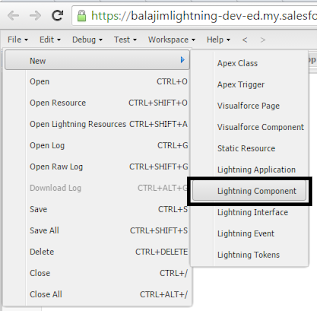
Give Name "AccountsComponent"
After click on "Submit" you can get the Component with Lightning Bundle at right Panel.


Now create an apex class(Server Side Controller)  with "@Auraenabled" methods which will be used in the above component.

Controller:
public with sharing class B_Lightning_AccountCls {
     @Auraenabled
       public static List<Account> retrieveAccounts(){
                    List<Account> accountList = new List<Account>();
accountList = [select id,name,AnnualRevenue,Industry,Website  from Account limit 5];
                   return accountList;
}
}

Now include the controller in the component by using "controller" attribute.

<aura:component controller="B_Lightning_AccountCls">
</aura:component>

Use <aura:atrribute> tag to hold the values from the javascript controller .

<aura:attribute name="Accounts" type="Account[]"/>


Here the "init" handler  used for performing action when component initialized.

<aura:handler name="init" action="{!c.myAction}" value="this"/> 


Here "myAction" is  a method in "controller" which we can create from the "controller" in lightning bundle  .
Component Code:

<aura:component controller="B_Lightning_AccountCls">
    <ltng:require styles="{!$Resource.Lightning_slds+'/assets/styles/salesforce-lightning-design-system.css'}"/>
     <ltng:require styles="{!$Resource.Lightning_slds+'/assets/styles/salesforce-lightning-design-system.min.css'}"/>
    <aura:attribute name="Accounts" type="Account[]"/>
      <aura:handler name="init" action="{!c.myAction}" value="this"/>
    <div class="container">
        <div class="slds">
            <br/> 
            <ul class="slds-has-dividers--around-space">
                <li class="slds-item">
                    <div class="slds-tile slds-tile__detail">
                      <strong>Accounts Info</strong>
                     </div>
              </li>
                <aura:iteration  items="{!v.Accounts}" var="accountObj">
                     <li class="slds-item">
                        <div class="slds-tile slds-tile--board">
                          <p class="slds-truncate" title="Anypoint Connectors"><a href="javascript:void(0);">{!accountObj.Name}</a></p>
                          <div class="slds-tile__detail slds-text-body--small">
                            <p class="slds-text-heading--medium">{!accountObj.AnnualRevenue}</p>
                            <p class="slds-truncate"><a href="javascript:void(0);">{!accountObj.Website}</a></p>
                            <p class="slds-truncate">{!accountObj.Industry}</p>
                          </div>
                        </div>
                    </li>
                </aura:iteration>
            </ul>            
        </div>
    </div>
</aura:component>

Click on "Controller" to create method.


Controller Code:

({
myAction : function(component, event, helper) {
var  action = component.get("c.retrieveAccounts");
        action.setCallback(component,function(data){
            component.set("v.Accounts",data.getReturnValue());
        });
        $A.enqueueAction(action);
}
})

var  action = component.get("c.retrieveAccounts"); //This is used for invoking the method 

Now we have completed component creation.

Now create a lighning app to see our output:

Navigation:


Now Give Name "AccountsApp" for application:


Click on Submit  and then we can see app with the following tag:

Now include your component by using "<c:componentName/>
<aura:application>
    <c:AccountsComponent/>
</aura:application>

Note the if we are creating package use package namespace in the place of "c" for specifying the component.
Eg:<baluPackage:AccountsComponent/>

Here baluPckage is the name space.

To see your out put click on "Preview" in the Application right panel as shown below.


Output:


References:

https://www.lightningdesignsystem.com/components/tiles/

https://developer.salesforce.com/docs/atlas.en-us.lightning.meta/lightning/ref_tag_iteration.htm


Sunday 26 June 2016

Storing the attachments in Local Folder from Salesforce.com through JAVA using enterprise WSDL

Hi,

We have a requirement to store attachmentsv in a local folder from salesforce.com.For that we have to download Enterprise.wsdl and convert it into Enterprise.jar by using wsc-23.jar then add them to your java project . After this process you just need to create the following class.


import java.io.File;
import java.io.FileOutputStream;
import java.io.IOException;
import java.net.URISyntaxException;
import com.sforce.soap.enterprise.Connector;
import com.sforce.soap.enterprise.EnterpriseConnection;
import com.sforce.soap.enterprise.QueryResult;
import com.sforce.soap.enterprise.sobject.Attachment;
import com.sforce.soap.enterprise.sobject.Doctor__c;
import com.sforce.ws.ConnectionException;
import com.sforce.ws.ConnectorConfig;
import java.util.ArrayList;
import java.util.List;

public class ExportDocstoFFolder {

public static void main(String[] args) throws NumberFormatException, IOException, URISyntaxException {

  //Create a new connectionconfig to your Salesforce Org
   ConnectorConfig sfconfig = new ConnectorConfig();
   //Use your salesforce username = email
   sfconfig.setUsername("XXXXX");
   //Use your saleforce password with your security token look like:
   sfconfig.setPassword("XXXXsecurityToken");
   EnterpriseConnection partnercon = null;    
   try {
   
       // create a salesforce connection object with the credentials supplied in your         connectionconfig
       partnercon = Connector.newConnection(sfconfig);    
QueryResult describeGlobalResult = partnercon.query("select Id,Name,Body from Attachment");   
       boolean done = false;
       while(!done)
       {
        for (int k = 0; k < describeGlobalResult.getRecords().length; k++)
        {
       
           Attachment a = (Attachment)describeGlobalResult.getRecords()[k];
           File path = new File("F://SFDCAttachments//Balaji");
           String mySubFolder=a.getId();          
           File newDir = new File(path + File.separator);        
           boolean success = newDir.mkdirs();          
           FileOutputStream fos = new FileOutputStream(newDir + File.separator+ a.getName());
                            fos.write(a.getBody());
           fos.close();
        }
        if (describeGlobalResult.isDone()) {
               done = true;
            } else {
            describeGlobalResult = partnercon.queryMore(describeGlobalResult.getQueryLocator());
            }
       }
     
     
   } catch (ConnectionException e) {      
        e.printStackTrace();
   }
}
}


out put :
---------
After running java class:


"F" folder which is recieved attachements:


References:
To generate Jar files for Enterprise.wsdl
http://salesforce-walker.blogspot.in/2011/12/to-access-salesforce-data-from-java-we.html

https://thysmichels.com/2013/01/11/java-code-export-salesforce-attachements-to-dropbox/

How to include a screen flow in a Lightning Web Component

 Hi, Assume  you have a flow called "Quick Contact Creation" and API Name for the same is "Quick_Contact_Creation". To i...